Master The Art Of At-Home Manicures: Your Complete Guide To Basic Manicure Steps
Ever wondered how to achieve salon-quality nails without the salon price tag? The secret isn't locked away in a professional's toolkit—it's a series of simple, repeatable basic manicure steps you can master at home. Whether you're a complete beginner or looking to refine your technique, understanding the foundational process is the first step toward gorgeous, healthy nails. This comprehensive guide will walk you through every stage, from preparation to perfect polish, transforming your nail care routine forever.
A professional manicure is more than just a cosmetic treat; it's a form of self-care that promotes nail health and boosts confidence. By learning these core techniques, you save money, gain a valuable skill, and can enjoy a relaxing spa-like experience anytime. Forget rushed appointments and inconsistent results—with this structured approach, you’ll consistently achieve a polished, put-together look. Let’s dive in and unlock the secrets to a flawless at-home manicure.
Why Mastering the Basic Manicure Steps at Home is a Game-Changer
Before we get into the nitty-gritty, it’s worth understanding why taking these steps yourself is so powerful. The global nail care market is booming, valued at over $11 billion, with a significant shift towards at-home solutions. This trend isn't just about cost-saving; it’s about control, hygiene, and personalization. When you perform your own manicure routine, you dictate the products, the pressure on your cuticles, and the final result. You avoid the risk of infections from improperly sanitized tools and can tailor every step to your nail type—whether you have brittle, thick, or weak nails. Furthermore, the process itself is therapeutic. Setting aside 30-45 minutes for a focused, mindful ritual can reduce stress and provide a tangible sense of accomplishment. You’re not just painting nails; you’re investing in your well-being and building a sustainable beauty habit.
The Essential Toolkit: Your Foundation for Success
Step 1: Gather Your Tools and Prep Your Space
A successful manicure begins long before you touch your nails—it starts with having the right tools and a clean, organized workspace. Think of this as setting the stage for a performance; without the proper setup, even the best technique will falter. You don’t need a professional’s arsenal, but a few key items are non-negotiable for a safe and effective basic manicure.
Essential Tools for a Professional-Like Manicure:
- Nail Clippers & Nail Files: Use separate tools for fingernails and toenails. Opt for a fine-grit (180-240) file for shaping; avoid metal files which can cause splitting.
- Cuticle Pusher & Nipper: A wooden or metal pusher for gentle lifting, and a sharp, high-quality nipper for precise trimming only of hangnails, not the entire cuticle.
- Cotton Balls/Pads & Nail Polish Remover: Pure acetone for gel removal, but a non-acetone remover is gentler for regular polish and daily cleaning.
- Base Coat, Color Polish, and Top Coat: Invest in good-quality polishes. A base coat prevents staining and helps polish adhere; a top coat adds shine and protection against chips.
- Cuticle Oil & Hand Cream: For deep hydration and nourishment. Look for ingredients like jojoba oil, vitamin E, or shea butter.
- Bowl of Warm, Soapy Water & a Small Towel: For soaking.
- Buffer Block: For smoothing the nail surface (optional but recommended for a glossy finish).
- Dust Brush: To remove filing debris.
Creating a Clean, Relaxing Environment:
Lay out all your tools within easy reach. Wipe down your surface with disinfectant. Ensure you have good lighting—natural light is best, but a bright lamp works. Have your timer ready if you’re soaking nails. A clutter-free space minimizes contamination and lets you focus on each manicure step with precision. Pro tip: Keep a small bowl of warm, soapy water nearby for quick clean-ups of polish mistakes or sticky residue.
The Core Process: Your Step-by-Step Basic Manicure Guide
Step 2: Remove Old Polish and Cleanse Thoroughly
This initial manicure step is about starting with a truly blank canvas. Even if you have no polish, this cleansing phase is crucial for removing oils, dirt, and lotions that will prevent new polish from adhering properly.
Begin by saturating a cotton pad with nail polish remover and pressing it firmly against each nail for a few seconds to dissolve the polish. Wipe in one smooth motion from cuticle to tip. For stubborn glitter or gel, you may need a second pad and a bit more time. Once all residue is gone, take a fresh cotton pad with remover and go over each nail and the surrounding skin one last time. This final wipe ensures no oily film remains. Pay special attention to the sidewalls and the area under the free edge. A perfectly clean surface is the single most important factor in achieving a long-lasting manicure that doesn’t chip prematurely.
Step 3: Shape and File Nails with Precision
Now it’s time to sculpt. The shape you choose—square, oval, almond, or coffin—should complement your finger shape and lifestyle. This basic manicure step is where personal style meets nail health.
Filing Technique is Everything:
Always file in one direction, from the outer edge toward the center. Sawing back and forth creates micro-tears in the nail layers, leading to weakness and splitting. Use light, gentle strokes. For a smooth shape, hold the file flat against the nail edge. If you’re creating a rounded shape (like an oval or almond), use a gentle curving motion. File the top surface only if you have significant ridges or bumps, and use a very fine buffer for this, not a coarse file. Aim for a uniform length; a good rule is to leave about 1-2 millimeters of white free edge. Remember, shorter shapes are generally stronger and more practical for daily life.
Step 4: Master Cuticle Care: Soften, Push, Trim (If Absolutely Necessary)
This is the most delicate and often-misunderstood manicure step. Proper cuticle care is about maintenance, not removal. Your cuticles are a protective seal; damaging them invites infection.
The Soak & Soften:
Fill a small bowl with warm water and add a drop of gentle soap or a dedicated cuticle softener. Soak your fingertips for 5-7 minutes. This softens the dead skin, making the next steps safe and easy.
Gentle Pushing:
After soaking, pat hands dry. Apply a cuticle cream or oil. Using a cuticle pusher (wooden or metal, with a flat edge), gently push the softened cuticle skin back from the nail plate. Work from the center outward, using very light pressure. The goal is to reveal the lunula (the half-moon at the nail base) and create a clean margin, not to remove the entire cuticle. Never force it. If it doesn’t move easily, soak for another minute.
Strategic Trimming:
Only use a cuticle nipper on hangnails—those pesky, torn pieces of skin separate from the main cuticle. Never trim the live cuticle tissue flush against the nail bed. This creates an open wound. Snip hangnails as close to the base as possible without cutting into healthy skin. After this step, your nails should look elongated and clean, with a defined, healthy margin.
Step 5: Exfoliate and Hydrate for Ultimate Nail Health
With your nails shaped and cuticles tended to, it’s time to treat the entire hand. This manicure step elevates your routine from simple polish application to true hand and nail care.
Exfoliation:
Mix a tablespoon of sugar or fine-grained salt with enough olive oil or coconut oil to form a paste. Gently massage this scrub onto your hands, focusing on the knuckles, cuticle areas, and any dry patches. The granules slough off dead skin, while the oil provides immediate moisture. Rinse thoroughly with warm water. For an extra boost, you can use a commercial hand scrub with alpha-hydroxy acids (AHAs) for a brighter complexion.
Deep Moisture Application:
This is non-negotiable. Apply a generous amount of rich hand cream or cuticle oil. Massage it in, paying special attention to the cuticle bed and the skin around your nails. For cuticle oil, apply a drop to each nail and massage it in. This step nourishes the nail matrix (the growth center) and keeps the cuticles supple, preventing painful cracks. Let the product absorb for a minute before moving to polish. Well-hydrated cuticles are the secret to a manicure that looks neat and feels comfortable.
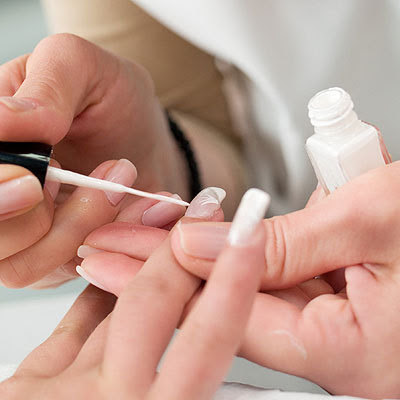
Step 6: The Polish Application: Base, Color, and Top Coat
The grand finale! This is where technique separates a DIY job from a salon finish. Patience and thin coats are your greatest allies in this basic manicure step.
The Three-Coat Rule:
- Base Coat: Apply one thin, even layer. Start a millimeter away from the cuticle and sweep to the tip, ensuring you seal the free edge. This coat creates a sticky surface for color and prevents staining. Let it dry completely (2-3 minutes).
- Color Polish: Apply your first thin coat of color. It’s better to do two thin coats than one thick, gloppy one that will take forever to dry and is prone to denting. Use the "three-stroke method": one stroke down the center, and one on each side. Cap the tip with a tiny sweep of polish. Wait 2-3 minutes between coats. Apply your second thin color coat identically.
- Top Coat: This is your manicure’s armor. Apply one generous, smooth layer. Use quick, even strokes, making sure to seal the tip again. A good top coat adds high shine and significantly extends wear. For extra durability, consider a quick-dry top coat.
Drying Time is Sacred:
Resist the urge to do anything with your hands for at least 10-15 minutes after the final top coat. For a foolproof finish, you can use a quick-dry spray or drop of cuticle oil on each nail after 5 minutes to help set the polish. Rushing this phase is the #1 cause of smudges and imprints.
Troubleshooting Common Manicure Mistakes
Even with the best basic manicure steps, things can go awry. Here’s how to fix the most frequent issues:
- Bubbles in Polish: This happens when polish is applied too thickly or from shaking the bottle. To fix, while the polish is still wet, roll the bottle between your hands instead of shaking. Apply thinner coats. If bubbles appear after drying, you can lightly sand the bubble with a fine buffer and reapply top coat to that area.
- Polish Chipping on the First Day: You likely didn’t cap the free edge (the tip of the nail). Always sweep a tiny bit of each coat (base, color, top) over the edge to seal it. Also, ensure nails are completely oil-free before starting.
- Cuticles Looking Dry or Ragged: You’re probably trimming too much or not moisturizing enough. Stick to pushing back softened cuticles and only snipping hangnails. Apply cuticle oil daily, not just during manicures.
- Streaky or Uneven Color: The polish was too thick, or you didn’t use enough strokes. Thin your polish with a single drop of专用 thinner if needed. Use the three-stroke method and ensure each coat is fully dry before applying the next.
- Staining from Dark Polishes: Always use a base coat. For extra protection on fragile nails, use a white or light pink base coat specifically designed as a barrier.
Conclusion: Your Journey to Perfect Nails Starts Now
Mastering these basic manicure steps is an empowering skill that combines art, science, and self-care. From the meticulous preparation of your tools to the final swipe of top coat, every stage contributes to a result that is both beautiful and healthy. Remember, practice makes perfect—don’t get discouraged if your first few attempts aren’t flawless. The more you perform this routine, the more intuitive and relaxing it will become.
The true beauty of learning at-home manicure lies in the control and consistency it gives you. You are no longer at the mercy of a salon’s schedule or a technician’s interpretation of your nail shape. You have the knowledge to maintain your nails’ health between color changes, to recognize problems, and to give yourself a moment of calm whenever you need it. So gather your tools, set the scene, and embrace the process. With this guide as your blueprint, you’re well on your way to achieving salon-perfect results, one basic manicure step at a time. Your nails—and your wallet—will thank you.