Master The Art Of Nail Shaping: Your Complete Guide To Flawless Manicures
Have you ever wondered why your nail polish chips faster on some nail shapes than others? Or perhaps you’ve stared at your nail kit, confused by the array of files and buffers, unsure which one to use for your desired look? The secret to a long-lasting, salon-quality manicure isn't just in the polish you choose—it's fundamentally rooted in nail shaping basics. Mastering this foundational skill is the difference between nails that look professionally done and nails that are prone to breakage, snagging, and premature chips. Whether you're a complete beginner or someone looking to refine their technique, understanding the core principles of nail shaping is non-negotiable for achieving healthy, beautiful nails. This guide will walk you through everything you need, from selecting the right tools to executing perfect techniques for every popular shape, ensuring your nails are always ready for their close-up.
Why Perfect Nail Shaping is the Foundation of Nail Health and Beauty
Before diving into the how, it's crucial to understand the why. Nail shaping is far more than a cosmetic step; it's a critical component of nail care that directly impacts the health, strength, and appearance of your nails. Proper shaping prevents damage, promotes even growth, and creates the ideal canvas for any polish or art. Neglecting these basics can lead to a host of problems, from painful hangnails to weak, peeling nails.
Think of your nails like the foundation of a house. If the foundation is cracked or uneven, no amount of beautiful siding (or in this case, nail polish) will make the structure sound or attractive. A poorly shaped nail with rough edges, jagged tips, or an unnatural contour will catch on fabrics, snag on objects, and cause the polish to lift at the edges. Furthermore, aggressive or incorrect filing techniques can thin the nail plate, create microscopic tears, and separate the nail layers, making them fragile and susceptible to splitting. By investing time in learning the correct nail shaping basics, you are actively investing in the long-term health and resilience of your nails, saving yourself time, money, and discomfort in the long run. It’s the ultimate act of self-care that pays dividends every single day.
Your Essential Nail Shaping Toolkit: Tools of the Trade Explained
You cannot build a masterpiece with the wrong tools, and nail shaping is no exception. The market is flooded with files, buffers, and blocks, each serving a specific purpose. Using the wrong tool for the job is a primary cause of nail damage. Let's break down the essential components of a proper nail shaping kit.
The Nail File: Grit, Material, and Direction Matter
The nail file is your primary shaping instrument. Its effectiveness and safety depend on two key factors: grit and material.
- Grit (Coarseness): This is indicated by a number, typically from 80 (very coarse) to 600 (very fine). For shaping the actual length and basic contour of the nail, you need a medium grit file, usually between 100-180. This is coarse enough to efficiently file the nail without requiring excessive pressure. For smoothing the edges and final finishing after shaping, a fine grit file (240-320) or a buffer block is ideal. Never use a coarse file (below 100) for shaping natural nails; it’s designed for acrylics or heavy-duty callus removal and will cause severe damage.
- Material: The two main types are emery boards (paper or cardboard with abrasive grit glued on) and glass/crystal files.
- Emery Boards: Inexpensive and disposable. They are effective but wear out quickly and can create more friction/heat if used aggressively. Opt for high-quality, flexible ones.
- Glass/Crystal Files: The professional favorite. They have a permanently etched abrasive surface that never wears down, create less friction and heat (reducing risk of nail separation), and provide an incredibly smooth finish. They are also more hygienic as they can be sterilized. Investing in a good glass nail file is one of the best upgrades you can make for nail health.
Crucial Rule: Always file in one direction only, from the outer edge of the nail toward the center. The sawing, back-and-forth motion creates a ragged edge, weakens the nail fibers, and leads to splitting. Think of it like sanding a piece of fine wood—you sand with the grain, not against it.
The Buffer Block: For Smoothness, Not Length
A buffer block is a rectangular block with graduated sides of varying grits (from coarse to very fine). Its sole purpose is to smooth the surface of the nail and create a natural shine after filing. It removes the tiny ridges and imperfections on the nail plate, allowing polish to adhere more smoothly and look more glossy. Never use a buffer to file down the length or shape of your nail. It is for surface refinement only. Use the finest grit side for the final shine, and always use gentle, light strokes.
Other Helpful Tools
- Nail Clippers: For initial length reduction. Choose a quality pair that makes a clean cut without crushing the nail.
- Cuticle Pusher & Nipper: For gently pushing back and trimming hangnails after shaping. Never cut live cuticles.
- Dust Brush: To sweep away filing debris before applying any products.
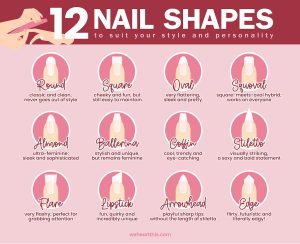
Popular Nail Shapes Demystified: Find Your Perfect Match
Not all nail shapes are created equal, and the "best" shape depends heavily on your natural nail bed shape, finger length, and personal lifestyle. Here’s a detailed look at the most popular shapes and their characteristics.
The Square: Bold and Modern
The square shape is achieved by filing the nail straight across at the tip, creating a sharp 90-degree angle with two perpendicular sides. It’s a strong, geometric look that makes short fingers appear longer and provides a large, flat surface for nail art. However, the sharp corners are prone to snagging and breaking, making it less ideal for those with very active hands or weak nails. It works best on wider nail beds.
The Squoval: The Practical Hybrid
A squoval (square-oval) is exactly what it sounds like: the straight-across edge of a square softened with a slight, gentle curve at the corners. This is arguably the most universally flattering and durable shape. It retains the lengthening effect of a square while eliminating the sharp, snag-prone corners. It’s an excellent choice for beginners and anyone seeking a low-maintenance, professional look that works for most finger shapes.
The Oval: Elegant and Elongating
The oval shape features gently rounded sides that taper to a soft, rounded tip. It is exceptionally elegant and has a lengthening effect, making it perfect for those with shorter fingers or wider nail beds. The smooth, continuous curve is strong and less likely to snag than a square. Achieving a perfect oval requires careful filing to maintain symmetrical curves on both sides.
The Almond: Dramatic and Feminine
The almond shape is a more dramatic version of the oval. The sides are filed straight in (tapered) from the widest point of the nail bed to a delicate, rounded tip, resembling an almond. This shape is very slenderizing and elegant but requires significant nail length and strength to maintain. The narrow tip is the weakest point and is susceptible to breakage if nails are short or brittle. It’s a high-fashion choice for those with naturally long, strong nails.
The Coffin/Ballerina: Edgy and Long-Lasting
Similar to the almond, the coffin (or ballerina) shape has tapered sides, but the tip is filed flat across, like a square, creating a dramatic, squared-off point. This flat tip is actually stronger than the rounded almond tip, making it a more practical choice for those wanting a long, dramatic shape without as much breakage risk. It requires good length and is a staple in the nail art world.
The Round: Classic and Low-Maintenance
The round shape follows the natural curve of the fingertip. The sides and tip are filed in a single, continuous arc. It’s the most natural, low-maintenance, and sturdy shape, ideal for very short nails, active individuals, or those with nail-biting tendencies. It doesn’t add length but is incredibly strong and snag-resistant.
Step-by-Step: The Correct Technique for Flawless Shaping
Now that you have your tools and know your desired shape, the technique is everything. Follow this foolproof process for every shaping session.
- Start Clean & Dry: Ensure nails are completely free of old polish and dry. Filing damp nails makes them too flexible and can cause layers to peel.
- Determine Your Shape: Look at your nail bed and finger. Which shape from above complements it best? Hold the file at a 45-degree angle to the edge of your nail. For most shapes (oval, almond, coffin), you'll file the sides at this slight angle to create taper. For square/squoval, the file will be more perpendicular to the nail edge.
- File the Sides First (for tapered shapes): For oval, almond, coffin, start by filing the sides. Place the file under the free edge, at your chosen angle, and make smooth, gentle strokes from the outer corner toward the center. Work on both sides evenly, frequently checking for symmetry in a mirror.
- Shape the Tip: Once the sides are tapered to your desired width, move to the tip. For a round or squoval tip, use short, gentle strokes to create the curve. For a square/coffin tip, file straight across. Always file in one direction.
- Smooth & Buff: Use the fine grit side of your buffer or a fine file to gently smooth any rough edges. Lightly run the buffer over the top surface of the nail to eliminate ridges. This step is key for a professional finish and polish adhesion.
- Final Check & Hydration: Examine your nails from all angles for symmetry and smoothness. Immediately follow with cuticle oil and hand cream. Filing can be drying, and hydration is the final step in maintaining nail flexibility and health.
Common Nail Shaping Mistakes (And How to Avoid Them)
Even with the right tools, certain errors can sabotage your efforts. Here are the most frequent pitfalls and their fixes.
- Sawing Back and Forth: This is the #1 mistake. It creates a frayed, weak edge. Solution: Commit to the one-direction stroke. It may feel slower at first, but it’s infinitely better for your nails.
- Using the Wrong Grit: A coarse file on a thin natural nail is like using a chainsaw for a haircut. Solution: Stick to 100-180 grit for shaping. Reserve coarse files for acrylics only.
- Ignoring the Natural Nail Bed: Fighting your natural nail shape (e.g., trying to make a very narrow oval on a wide, flat nail bed) leads to constant breakage. Solution: Work with your natural structure. A squoval on a wide bed is often more successful than a forced almond.
- Filing the Thickness: Pressing the file down onto the top surface of the nail to change its length or shape. This thins the nail plate dangerously. Solution: Only file the free edge that extends past your fingertip. The body of the nail should remain untouched by the file.
- Skipping the Buff: Going from a rough file directly to polish. Solution: Always finish with a fine buffer to seal the edge and smooth the surface. This small step dramatically improves polish wear.
- Not Cleaning the Brush: Filing creates dust that gets trapped under polish, causing lifting. Solution: Use a soft brush or a cotton pad with a little remover to wipe each nail clean before applying base coat.
Nail Shaping for Different Nail Types and Lifestyles
Your nail shaping routine should be personalized. Here’s how to adapt your basics.
- For Weak, Brittle, or Peeling Nails: Opt for the squoval or round shape to minimize stress on the weakest point (the tip). Use a very fine glass file and ultra-gentle strokes. File less frequently—only when you see visible snags or rough edges. Prioritize hydration with cuticle oils containing jojoba or vitamin E.
- For Short Nails: The squoval and round shapes are your best friends. They are strong and make the most of what you have. Avoid almond or coffin shapes, which require length to look balanced and are prone to breaking when short.
- For Wide Nail Beds:Oval and almond shapes are excellent for creating an elongating, slenderizing illusion. The tapered sides draw the eye vertically. A square shape can make a wide bed look even wider.
- For Active Hands (Gym, Typing, Manual Work): Durability is key. Choose squoval or round shapes with no sharp corners. Keep nails at a moderate, practical length. Ensure edges are perfectly smooth to prevent snags on clothing or equipment.
- For Nail Biters or Those with Short, Stubborn Nails: Start with the round shape. It’s the easiest to maintain and the strongest. As your nails grow out, you can gradually transition to a squoval. Celebrate every millimeter of growth!
The Ultimate Nail Shaping Maintenance Schedule
Consistency is key to keeping your nails in top shape between manicures.
- Daily: Apply cuticle oil to the nail plate and cuticle area. This keeps nails flexible and prevents hangnails.
- Every 2-3 Days: Do a quick visual check. If you feel a snag or see a rough edge, use your fine file or buffer to smooth it immediately. Don’t wait, as a small snag can lead to a big tear.
- Weekly: Perform a full shaping session if needed. Most people need to file their nails every 1-2 weeks to maintain their desired length and shape. Use the full step-by-step technique.
- As Needed: Soak nails in warm, soapy water for 5 minutes before shaping if they are very dry or brittle. This softens them slightly and reduces friction. Do not file immediately after soaking if nails are overly soft—pat dry and wait 10 minutes.
Frequently Asked Questions About Nail Shaping Basics
Q: Can I use a nail clipper to shape my nails?
A: Clippers are for reducing length, not for shaping. Clipping creates a blunt, straight edge that is very weak and prone to splitting and peeling. Always use a file for the final shaping contour after clipping.
Q: How often should I replace my emery board?
A: After about 5-10 uses. When the surface becomes smooth and no longer feels gritty, or if it starts to bend and flex excessively, it’s time to toss it. A worn file is ineffective and can damage nails.
Q: What’s the difference between a glass file and a crystal file?
A: Essentially nothing; the terms are used interchangeably. They both refer to a file made of tempered glass with a permanently etched abrasive surface.
Q: My nails are splitting down the middle. Is filing making it worse?
A: Improper filing can exacerbate splitting. Ensure you are filing in one direction with a fine grit, not thinning the nail plate. Also, hydration is critical. Use a strengthening base coat and cuticle oil daily. The split may be due to internal factors (diet, health) as well.
Q: Should I file my nails before or after a bath/shower?
A: After. Filing damp nails makes them too flexible and can cause the layers to separate and peel. Always file on completely dry nails for a clean, precise cut.
Q: How do I fix a nail I filed too short or the wrong shape?
A: Unfortunately, you cannot add length back with filing. The only solution is to let the nail grow out. This is why it’s always better to file a little at a time, checking your progress frequently. When in doubt, leave it a millimeter longer than you think you want.
Conclusion: Your Journey to Nail Mastery Starts Here
Understanding and applying these nail shaping basics transforms your nail care routine from a chore into a empowering ritual of self-maintenance. It’s the unsung hero behind every stunning manicure, the bridge between casual polish application and true nail artistry. Remember, the goal is not just a pretty shape, but a healthy, strong, and smooth nail that serves as the perfect foundation. Arm yourself with the right tools—a quality medium-grit glass file and a buffer block—commit to the gentle, one-direction stroke, and choose a shape that respects your natural nail structure and lifestyle. With practice and patience, you will develop the eye and touch of a true professional. Your nails are a canvas, and shaping is the first, most important brushstroke. Master it, and the rest—the color, the art, the shine—will simply fall into place, looking better and lasting longer than ever before. Now, go forth and shape with confidence